Scrappy Creations
Friday, April 4, 2014
Sunday, July 14, 2013
More quilting, Craftsy 2012 BOM
 First I drew up this design on butcher paper. Then I ironed it to the block below and stitched over that, tracing each line. Learned a lesson with this one......never use pencil. I've used pencil on parchment paper and had some transfer of the lead to the thread, but with butcher paper it was worse. In the future I will draw my designs on other paper and then trace it on the butcher paper with sharpie fine point pen.
All the other blocks were either just stitch as I go or I drew guides and lines on the fabric in disappearing ink.
This one is hard to see. It's stem rose buds with one leaf on each stem coming out in a circle from the center. Then scroll work in the corners.
This on is my mother favorite block.
This one is hard to see, but it's 1/4 of a flower. The center of the flower is in the bottom right corner.
I just love how this Dresden plate block turned out!
I am having so much fun trying out new designs and techniques on this quilt! But I can't wait to finish it either and move on to my son's patriotic train quilt. Six blocks left to go!
Sunday, June 23, 2013
WIP Quilting my Craftsy BOM 2012.
I had time to get a couple more blocks done on my Craftsy 2012 Block of the Month quilt. Again I started with drawing out my design on butcher papers and then quilting it. On the other block it was completely free motion except for some guide line for the rose teams.
Here is the drawing I made for the following block.
Then I also had time to do this block. It's hard to see, but it's rose buds that extend out from the center in a circle. Then scrolls in the corners. It turned out pretty cute.
Wednesday, June 12, 2013
Quilting 2012 Craftsy BOM
I had so much fun making the top for the Craftsy Block of the Month 2012. Now I'm quilting it. Here are just a few of the block I've been working on the last few days. This is all free motion quilted on my little sewing machine, except for the last one.
This last block I decided to try my hand at hand quilting. It turned out okay. Can't say I'm a fan though.
Monday, June 3, 2013
The 4H raffle quilt
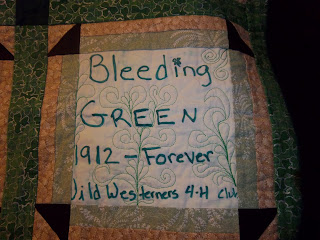
 I've got to say I think this was the funniest project I have done yet. The Wild Westerners 4H club, that we belong to, decided to do a quilt this year that we could raffle off. So I got the supplies. The first part of the project was to have the children participate by decorating a block. I was exhausted by the end of the night, but I still found it to be fun.
I began by cutting 9 1/2" squares of white cotton. My biggest dilemma was the fact that the fabric paints said to not pre-wash the fabric. Any quilter will tell you, you always pre-wash your fabric because cotton will shrink? So guess what happened to my squares.......yup they shrunk. I lost about and 1 1/2" off the squares because they not only shrank, but some of them tweaked at an angle, so to make them all the same I had to cut them down.
My original plan was to only have the sashing of the clover fabric between the squares. Now I see that maybe this was a blessing because my original plan would have been a bit boring. So I had to get creative. So I designed up a double strip border with half square triangles in the corners. When you put them together it almost looks like a plaid.
 Anyway I got the quilt top finished and my layers put together. Then it was time to start quilting. Following are pictures of that work.
These two squares were saved for last. They were my most challenging squares. When you look at the front of the squares you may understand why I found them such a challenge. They didn't exactly inspire me, but I wanted to make the squares special. After all some wonderful children were obviously inspired, even if I couldn't see the inspirations. That's when I came up with the art work that ended up on these squares. It wasn't the usual flowers, feathers and echoes I had done on the others.
 I drew the designs out on plastic coated butcher paper, the I ironed that to the quilt. That made it so much easier to do this design and keep it symmetrical. By the way I found an LED light on my android and the glass (with book drawer below) on my coffee table made a great light table for tracing the design onto the rest of the paper when folded!


New Look
Yes, if some of you are wondering, it's still me. I decided it was time for not only a new look, but for my blog to match my Etsy shop. My previous blog was Quilting Heritage. I've transferred some of the posts that were important to me to this blog. I will be abandoning Quilting Heritage and I'll start posting all my new quilting relate posts here.
So welcome to Scrappy Creations.
So welcome to Scrappy Creations.
Mariners Compass, Part II
In my last post Mariners Compass I went through the steps I took to create the Mariners Compass in the center. In this post I'll explain how to finish out your Mariners Compass.
The first thing I wanted was a small 1" border around the compas. I folded the Compass in half and layed it on the fabric I would use for that border. Then I measure 1.5" around the compass and marked with white chalk. I want the border to be 1", so this requires a 1.5" strip to allow for 1/4 seam on both sides. Remember you want to cut your stip on the curve. Don't use a 1.5" straight strip. You can, but you will likely end up with pukers in the fabric as you attach it to the block, and it will require relief cuts. By cutting on the curve you avoid all this. It takes a little more work up front, but saves you a lot of hassle later.
Two strips cut. Note the strips are cut with at least an extra 1/4" at each end. These will need to be attached to each other after they are sewn on the compass.
Carefully pin the strip to the compass. Don't attach the strips together yet. As you attach the strip it will sometimes stretch and move so that you may have more than 1/4" at the ends. Sew the strip to the compass with 1/4" seam. Leaving about and 1" or so and the ends of the strip unattached. Mark the ends of the strips where you want the seam. I did this by folding the strips where I wanted them to attach and pressing with my iron. It makes an easy mark to follow. Then fold the compass in half, pull the strip away from the compass and sew the strips together. Trim the seam, press and sew to the compass to complete the strip.
Next to complete the square. I put the compass folded in fours on top of fabric also folded in fours in order to create four corners. I planned this a little oversized so that I can square up the block when complete. To do the corners, it's really the same process as I used for the strip, only in four pieces instead of two. Also an extra step noted below before pinning.
Trimmed out and ready to attach. Notice the excess at the ends. Now to attach this I took an extra step before pinning the fabric. You will want you corners to match up with the center point (the orange point on this piece). Take your corner piece and fold in half diagnally at the corner so that you have a fold going out from the middle point to the corner. Use that fold to line up the point with the corner.
The finished Mariners Compass. This one measure 23 x 23.
Subscribe to:
Posts (Atom)


