Monday, June 3, 2013

Mariners compass, Part I

I spent a full weekend on this project, but I'm pleased with the results. I think I mastered this paper pieced block. I took photos to help me describe each step so others can learn to do this beautiful Mariners Compass block.
First I determined that I needed a block that is 19.5" squared. I taped two pieces of parchment paper together to be large enough and then cut the square. Now there were several other instructions that I found instructing you to draw lines to dissect the square. However, I found it much simpler to fold the square in half and half again. This would give you the four square quadrants. Then I unfolded. Next I fold in half from corner to corner and in half again to the opposite corners. Hopefully my photo is clear enough that my folds can be seen.

There are a lot of great books out there that help you understand how to draw out any style Mariners Compass you desire. Then I dissected my pattern into sections. I traced a section from one large point to the next. Then using my copier I copied each section for paper piecing. 

Here are the four bocks I came up with that made since for paper piecing. The two large point styles I made four copies and the two group blocks I needed eight copies.

Next to choose my fabrics. I wanted a darker back ground with bright colors for the points to pop.


The first small group. You do need a basic understanding of paper pieced quilt blocks to do this.

Second block, just like first but with the additional medium point.

Now the fun begins.

Now that each block is complete, it's time to assemble the blocks. Using a pin; poke pin through point of one block at top of seam and push through the second block where seam is to join up. This aligns the blocks with accuracy. (see two above photos, front and back)

This is what the blocks should look like before you sew.
 First completed assembly
 Fold out and iron. Insure that seams are lined up and that you have left a 1/4" (apx) at the top for future assembly.
 Starting to lay out blocks to get an idea of final assembly
Attach the next block.

 Attach largest point to make complete unit
 Attach one small black to each complete block.
Final Assembly of paper pieced unit (with out appliqued center) from front. The back view in photo below show all the paper still on block and what that will look like.

Remove the paper. Remember the smaller your seam the easier to remove the paper. Note to self - don't get the paper wet next time and it'll come off easier with out such a mess. FYI I sometimes spritz my blocks with water to seam them really good for crisp seams. I don't advice this with paper pieced blocks. 
The finished assembly with appliqued center. Now I just need to lay this out and trace for my back ground to make this a square. This was a practice piece as I didn't want to waste the fabric for my son's Lone Star quilt. Now that I've practiced one (I'll have to find a use for this one) I can do the real thing for his quilt.

Goth scrap quilt

I delivered the Goth quilt to the girl at work that hired me to do a lap quilt for her. She was in love at first sight. She was so excited and loved the hand quilted spider web I did too. This quilt was a lot of fun to do and the first time I had ever done a quilt as you go project. I loved it. I know it won't work for everything I do, as my favorite is the Lonestar quilt, but it is certainly a fabulous way to bust out your scrap pile. I plan to do many more of these, but not likely with a Gothic theme.
The start. Not quit center. One thing she loves and gave me to use, was an old corsett. Se I sewed the ends (back) on top of a piece of red. This will be laced up later with black ribbon. Then I began adding pieces around it. I used many different pieces of black lace she provided, which I lined with a fabric that would make the lace stand out.

Yes she loves spider webs, so there were a lot of fabrics with webs.

The finished quilt.

The black spider web hand quilted on a section of red.

The corset all laced up.

Buttons, rick rack, lace and ribbons added for fun and texture.
This project was fun!

Wolf table runner


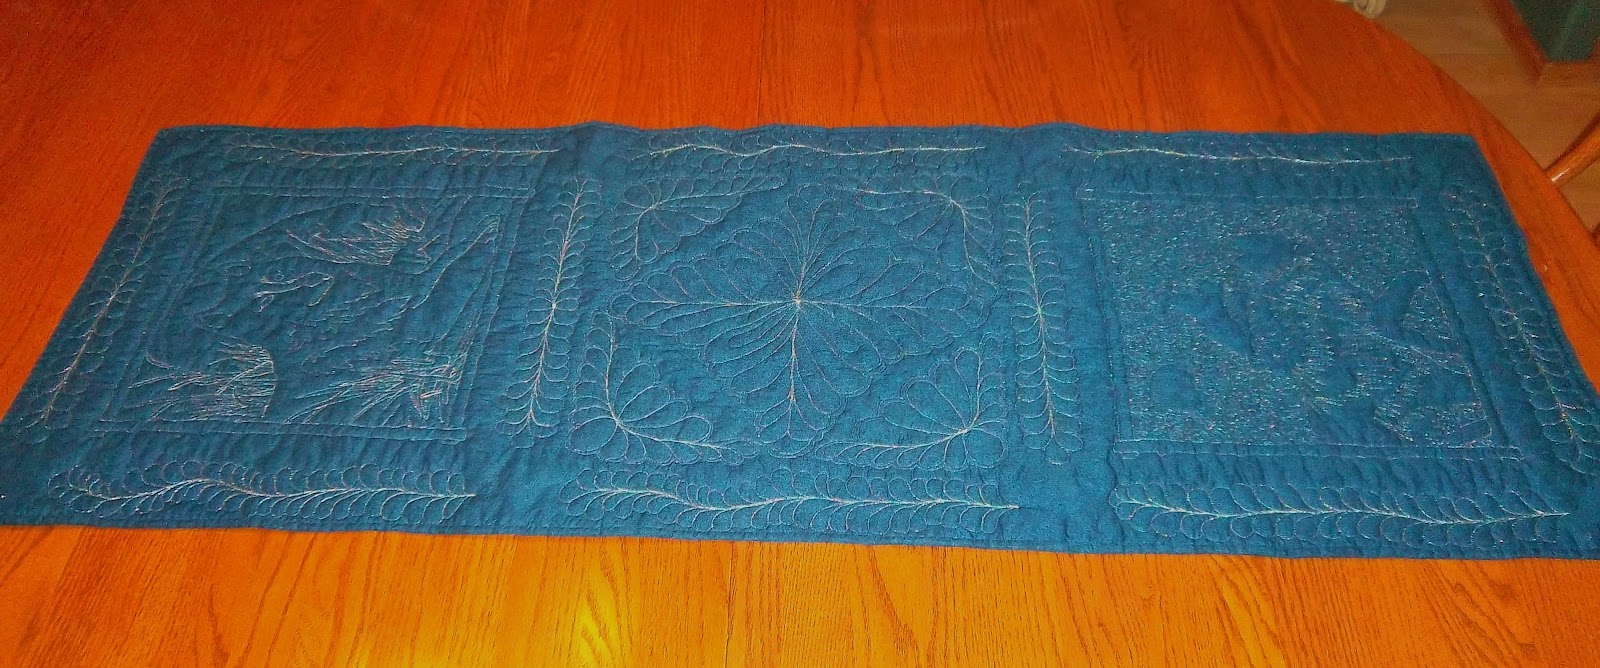
This one I am extremly proud of. The inspiration just came to me one day to use the two wolf blocks I had. I decided to do a table runner with a simple quilt block between the wolf blocks. I didn't know what I was going to do for the quilting until I had the layer together. The center block was the first one to come to me with a couple different feather designs.

Then I used the wolf images to dictate the quilting of those blocks. My favorite part of the quilt is the back. I love the way the metalic thread just pops on the dark blue fabric.
This item is listed for sale on my Etsy shop, Scrappy Creations

Dream Catcher

I just realized that I never posted when I finished my Lone Star Native American Quilt that I call "Dream Catcher." In the center I free motion quilted a Dream Catcher with the feathers hanging below into the two bottom points of the star. In the other star points I free motion quilted alternating arrow and double feather designs. In the squares I just stiched the outlines of the Indian motif. My husband just loved it and talked me into finding a way to put it on our bed. The cream colored comforter I had works great under it and even shows it quit well. I also made a ruffle that is under that and goes to the floor to cover up the sides of my bed. This quilt was quit an accomplishment!

Baby boy quilt


We are getting snowed in today. I've been out twice today with my husband to shovel and plow snow. I'm done. We'll have to start again tomorrow.


I'm back in working on a quilt today that my husband asked me if I would make as a baby gift for a guy he works with. Him and his wife are expecting a baby boy in May. Here is the quilt I am working on for them.

The center is done with echo free motion quilting around the cars and the signs. The black border has a free motion quilting loop design done with clear thread, though over black it still shows up. I have yet to do the quilting over the squares. I would like to do a free motion design of loop and loop within loop, but in all my practicing I'm just not happy with my big loops. They aren't smooth and perfectly circular like I want. I'll just have to wait and see.

House quilt finished


Finally I finished my House quilt and hung it on the wall. It does have some flaws, so I'll probably never sale it. The flaws are on the back though, so it makes a great wall hanging.


This quilt was a test for me. I wanted to see if I could reuse scrap pieces of fabric discarded the the office furniture making process at work to make something beautiful. I did and it look great, but I soon realized these fabrics were not easy to work with. If I want to continue doing quilts, and I plan to, I'll go back to using cottons.


However, I am pursue other ideas to reuse the fabric my work discards to create wonderful pieces. Some of the ideas I have are pillows, pot holders, purses/bags, window coverings, etc. I'm open to further ideas if anyone has any.


I'll keep this quilt above my sewing machine for now and appreciate all the hard work that went into it every time I look up.

Two weeks of pride


I picked up a fabric a while back at Wal Mart with a Native American theme. I didn't even know what I wanted to do with it, and then one day it hit me..... that fabric would look great with a Lone Star design of bright colors taken from the fabric. So I went to buy a few pieces of those bright fabrics and also found a Native American design that would work great for the border.

Now I had all the fabrics. The fun part would be taking my time to do the Lone Star technique correctly. I had to be slow and precise with it. This is not a design you can rush on. I used Lone Star Quilts and beyond by Jan Krentz to guide me through this. When it was all finished I was proud of it. The last time I tried to do a star quilt I messed up so royally I threw it away, but this one, though there are a few minor errors, came out looking great.

I spent about two weeks on the weekends making this top. It's a queen sized top, so I don't know how I'm going to quilt that on my machine. I may end up quilting this one by hand as well. It would also help to give it that old fashioned style to it. I'm not sure which way I will go yet, but I know I'm very pleased with how the top came out.